Quantcast
Channel: Loadedpocketz
Viewing all 411 articles
Browse latest View live

Large Tactical Folder Deathmatch

$
0
0

I generally gravitate towards larger knives.  I have small hands for my size, but it’s all relative and a larger folder or fixed blade feels better in my hand than a smaller one. So, when I can legally do so, I usually opt to carry something at least 3.5″ in length.  For a while, my carry knife was a Zero Tolerance (ZT) 0300.  Then, for reasons passing understanding, I sold it.  I replaced it with a Benchmade Adamas. Then later, I found a great deal on another ZT 0300 series (this time a 0303). So now I have both, but I’m selling one of them.  How do these two very popular knives stack up against each other and which one did I opt to keep?  Read On.


The Zero Tolerance 0303 and Benchmade Adamas

The Zero Tolerance 0303 and Benchmade Adamas


SIZE

I’m not going to lie – both of these folders are beasts and not for the faint of heart.  Here are the stats on the Adamas:

Designer: Shane Sibert
Mechanism: AXIS
Action: Manual-opening
Blade Steel: D2
Blade Length: 3.82″ (9.7 cm)
Open Length: 8.70″ (22.1 cm)
Closed Length: 4.88″ (12.4 cm)
Weight: 7.68 oz. (217.7 g)


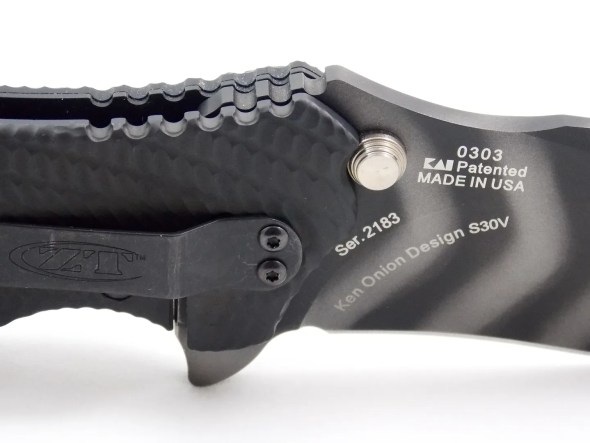
And here are the stats on the ZT 0303:

Designer: Ken Onion and Mick Strider
Mechanism: Speedsafe
Action: Assisted-opening
Blade Steel: S30V 
Blade Length: 3.75″ (9.5 cm)
Open Length: 8.60″ (21.9 cm)
Closed Length: 5.10″ (13.0 cm)
Weight: 8.00 oz. (226.8 g)


Both are very close in terms of overall length but the Adamas weighs slightly less due to Benchmade’s wise decision to drill out it’s steel liners.

Despite the weight advantage, the Adamas feels larger and chunkier in the pocket due to the thickness of its G10 scales.


The 0303 is wider but it’s also thinner so I didn’t notice it my pocket nearly as much.  Advantage: 0303


CUTTING ABILITY

The drop point blade of the Adamas makes it a better cutting tool and it’s easier to sharpen.  It’s harder to put an edge on D2 steel but it also holds an edge longer.  The 0303’s S30V came much sharper from the factory but both were razor-sharp once a proper edge was put on them.


The ZT’s tiger stripe Tungsten DLC (Diamond-Like Carbon) coating held up better with normal EDC use.  I didn’t beat either of these blades up, but as you can see in the above picture, the blade on the Adamas was already showing minor signs of wear.  Advantage – Adamas


DEPLOYMENT

I’ve always been a huge fan of Zero Tolerance’s Speedsafe assisted opening mechanism. The ZT blade opens easily with one hand and deploys quickly.  The AXIS mechanism on the Benchmade is super smooth for a manual knife and it also deploys fairly quickly with a flick of the wrist.  But, both of these knives have thick stout blades and the 0303 benefits from the spring assisted help that the Speedsafe opening provides.  Advantage – 0303


Both blades feature thick stock that is very fixed blade-like.

Both blades feature thick stock that is very fixed blade-like.


DEEP CARRY

Here’s how the Zero Tolerance 0303 carries in the pocket..


And here is how the Benchmade Adamas carries in the same pocket…


The Adamas pocket clip carries much deeper.  However, even after having Benchmade install a new clip, it lacked retention.  The reason is a small gap between the clip and the knife.  It just isn’t that tight.


The 0303’s pocket clip is the opposite.  It will shred your pockets over time if they are not reinforced.


Given the choice, I’d rather have my pocket shredded versus risk losing my knife.  I like how deep the Adamas carries, but it still has to be secure.  Advantage – 0303


VALUE

There is about a $100 difference in the street values of these knives.  Both are available but the 0303 has been discontinued by Zero Tolerance so it commands a bit of a premium.  Advantage – Adamas 


BOTTOM LINE

I opted to keep the Zero Tolerance 0303.  It carries better, deploys faster, keeps an edge, and I love the look of the tiger-striped blade.  Both knives have rock solid lock up and are almost fixed blade-like in terms of their durability.  However, if I’m going to EDC a larger folder, the one that is more comfortable in my pocket is going to get used and for me that proved to be the difference.  

The post Large Tactical Folder Deathmatch appeared first on .


Deal Alert: LBX Tactical Sale

$
0
0

LBX Tactical is having a 30% off Post-Christmas sale.  


lbx


For those of you who own an Arc’teryx Khard pack, it’s worth noting that the sale includes the LBX line of Khard inserts.  The MAP System is also on sale.  


I took advantage of the sale and ordered the following:


lbx-insert-order


The LBX inserts are reasonably priced to begin with and if I’m going to truly give the Khard a run, then I need to buy into the entire system.  This was a great opportunity to do that.  The sale ends January 2nd so move fast to make sure that the items you want are in stock.   

The post Deal Alert: LBX Tactical Sale appeared first on .

Arc’teryx Khard 30 Project

$
0
0

I’ve owned the Arc’teryx Khard 30 for about a month now.  I took advantage of a sale and grabbed one of the Black Limited Edition packs for a really good price (thanks Tactical Distributors).  The Khard 30 made it’s debut at the 2013 Shot Show.  I don’t know why I waited so long now that I’ve had a chance to carry it.


Arc'teryx Khard 30

Arc’teryx Khard 30


Arc’teryx says it “wanted to design a pack that appealed to the widest variety of users”.  Making a pack to be truly mission adaptable is difficult.  It has to be durable without adding a lot of weight. It has to be configurable with just enough built-in organization to be practical.  It must have load bearing capabilities but be streamlined and low-vis so that it can be carried in urban settings. My initial impression is that Arc’teryx nailed it.  The Khard 30 isn’t perfect and it isn’t cheap.  But, with the right setup, it can serve you well in a variety of roles.

“With the right setup”.  Yes, making a pack this configurable comes with a price.  To get the most out of it, you must invest in accessory pouches.  I call this pack a “project” because I’ve experimented with different setups to figure out what works best.  For instance, after LBX Tactical put them on sale, I purchased their Khard inserts to add some internal organization.


Khard 30 with LBX Tactical Inserts


This will be my initial Everyday Carry setup.  To start, I added LBX’s 13″ Laptop Insert.


It fits my HP Elite X2 and has another slip pocket for a tablet or small notebook.  It attaches to the Khard’s internal daisy chain system via gutted paracord with a barrel lock.  Not exactly easy to get on or off so I leave it attached 100% of the time.

I also added LBX’s 2-pocket and 3-pocket side sleeves for small item organization.  They are perfect for the long loop panels on each side of the Khard.


I wish the mesh was a finer gauge.  I’ve already snagged them a couple of times sliding other gear in and out of the pack.  But, they are cost-effective and whatever you store in them can be quickly accessed from either side of the Arc’teryx’s u-shaped main zipper.

The only non-LBX pouch I used was a Blue Force Gear Admin Dapper Pouch.  Mine is an older model but it’s close to the current design and attaches securely to the interior vertical loop area of the Khard’s outer panel.


Blue Force Gear Admin Dapper Pouch

Blue Force Gear Admin Dapper Pouch


I also needed something to conceal a firearm for the times that I need to off-body carry.  The LBX Grab and Go Pack is designed for “quick extraction w/ hideaway capability”.


LBX Tactical Grab and Go Pack

LBX Tactical Grab and Go Pack


It features two interior full loop panels that can be used to attach accessories.  In my case, I mounted my S&W Shield in a kydex holster and a Blue Force Gear 10-Speed Triple Pistol Dapper Pouch.


When not carrying, I can attach other hook and loop pouches to the inside of the Grab and Go Pack for more organization or use it as a packing cube for clothing.  It’s a very versatile piece of kit.

For hiking, I haven’t quite nailed my ideal setup.  Right now, I’m carrying my hydration bladder in the main compartment and using the side mesh panels to organize small items like my fire starter kit, etc.


The hose routes from the top and the Khard has attachment points to secure it.


Arc’teryx says a bladder can be carried in the Khard 30’s side zippered compartments so I’m going to try that also.  For a quick access FAK, I’m using a velcro-backed Mystery Ranch pouch.


Overall, it’s been fun trying different setups.  I don’t feel like I have it completely dialed-in yet and I haven’t tried it in other roles (e.g range duty, vehicle bug-out, etc.) but overall the Arc’teryx Khard 30 has really impressed me with its versatility.

Stayed tuned for a full review – coming soon.

The post Arc’teryx Khard 30 Project appeared first on .

Hill People Gear Longhouse Instructional Series

$
0
0

It’s been a while since I’ve visited the Hill brother’s YouTube Channel.  Since then, they’ve started to add instruction videos.  In their October newsletter, they described the rationale behind the Hill People Gear Longhouse Instructional Series:


We’ve just launched a new instructional video series on YouTube. The Longhouse Instructional Series goes hand in hand with the equipages section of our website with more hands on information including gear and techniques based on our time on the trail. There are folks who have more experience than us, and folks who have less. Whichever camp you’re in, we hope you find something of value in this video series. We’ve also organized our YouTube channel into playlists. In addition to the Longhouse playlist, there is also a product playlist and an in the field playlist.


I’ve just watched their video on Clothing Systems.  It’s an absolute masters class on outdoor layering.  It’s long but definitely worth the time investment. 


To a large degree, it validated my layering system.  For winter hiking, I’ve made the transition from a Patagonia Adze softshell jacket over a synthetic baselayer to a three layer system that includes:

  • Outerlayer:  Triple Aught Design Raptor – this is a shell made from Polartec Neoshell, which is both breathable and somewhat water-resistant as long as you maintain the DWR.  I’ve written a two-part review on it.  Part 1, Part 2.  

For pants, I  wear the LL Bean Knife’s Edge softshell pants.  Read my First Look article here. I’ve worn them for a couple of years now.  I’d put them up against anything from TAD or Arc’teryx at less than half the price. 

  • Midlayer: Patagonia Nano Air Hoody – in my system, this has taken the place of the TAD Equilibrium (EQ) jacket.  The Nano Air’s FullRange synthetic insulation has a good warmth to weight ratio, it’s very breathable, and the jacket is extremely comfortable because it stretches as you move.  The same could be said of the EQ and its Polartec Alpha insulation. The major difference between the two is that the Nano Air comes with a hood that fits perfectly inside the hood of the Raptor.  I can wear it standalone or under the Raptor’s Hood to keep my head and the back of my neck warm.  For me, the Nano Air also fits a little closer to the body without being restrictive so it’s a bit warmer.

Note:  I know HPG discounted the notion of a midlayer, but in this area, the forest preserves are relatively flat so I don’t heat up as much.  When I snowshoe, I forgo the midlayer and only wear a shell over a baselayer. The same when I camp since I’m hauling more gear and I save the midlayer for when I stop to make camp.

  • Torso Baselayer: Synthetic (Generic) – like was mentioned in the video, this for me is a commodity item.  I do vary the weight depending on the activity and weather, but I pretty much use whatever I have on hand.
  • Bottom Baselayer: Cabelas E.C.W.C.S – I have these bottoms in all three weights (Polar, Mid, and Tech).  They are made from Polartec Power Dry, which is a grid fleece.  Very comfortable and warm depending on the weight.  They also wick moisture and dry very quickly.  
  • Boots/Socks:  LL Bean water-resistant boots with warm socks – usually a wool blend although recently I’ve experimented with socks made from Bison Down.

By understanding how layering works and the different options, you’ll definitely save yourself a lot of time, money, and frustration upfront.  Everyone is different so what works for me or even the Hill brothers might not work for your situation.  So, be willing to endure a little trial-and-error in the field. Eventually you’ll settle upon a system that makes your outdoor activities much more comfortable, and in turn, enjoyable.              

The post Hill People Gear Longhouse Instructional Series appeared first on .

First Look: Triple Aught Design Azimuth Pack

$
0
0

I just got in the Triple Aught Design Azimuth Pack.  I initially purchased the Black/Brindle version but quickly sold it and put in my order for the all black edition along with the Admin Panel 1.  


Triple Aught Design Azimuth Pack with the Admin Panel 1

Triple Aught Design Azimuth Pack with the Admin Panel 1


The Black/Brindle combo was interesting but I just love all black bags.  And, as you can see, it’s a gorgeous pack.  The VX-21 Sailcloth material has a striking diamond pattern and a sheen to it. Pictures really don’t do it justice.   

I’ll cover the features in more detail later in my review but let’s be clear.  One use case for the Azimuth is a packable option that can be paired with the Meridian Transport Case or other luggage for carry as a primary or secondary when you arrive at your destination.  But this isn’t a run-of-the-mill packing cube backpack.  It’s very feature rich with multiple access points, internal and external zippered pockets, helix attachment points for customization, two water bottle pockets, and advanced water-resistant materials.

The straps are unstructured and minimalist.  


dscn3052


The Azimuth, as with other packs in this same class, is designed for light duty. For heavier loads, look to Triple Aught Design’s Fastpack EDC and Litespeed or another option entirely.          

The Admin Panel 1 pairs well with the Azimuth.  It slides on rails so that it can be removed and accessed outside the pack without having to detach it.  It also features the same water-resistant materials including a YKK Aquaguard zippered compartment.  


Reverse side of the Admin Panel 1

Reverse side of the Admin Panel 1


It mounts to the two Helix attachment points at the top of the Azimuth’s main compartment.


dscn3059


Stay tuned for a full review.  Coming soon!  

The post First Look: Triple Aught Design Azimuth Pack appeared first on .

First Look: All-New 2017 Camelbak Urban Assault Pack

$
0
0

The Camelbak Urban Assault has been one of my favorite EDC packs ever since I reviewed it back in 2012.  Now the company has released a follow-up.  


All-New Camelbak Urban Assault for 2017

All-New Camelbak Urban Assault for 2017


The All-New 2017 Camelbak Urban Assault is slightly larger than it’s predecessor and features an internal wire frame and ergonomically shaped back panel that is designed to comfortably handle heavier loads.  Some complained about the original pack’s straps and Camelbak has responded by making them wider.  


M17_UrbanAssaultGMI_Back34_Master
The original CUA offered excellent electronic gear protection and it looks like Camelbak kept that in the current design.  They’ve also added a hi-vis interior (which reminds me of the colors used by Spec Ops) to make locating kit inside the pack easier in low light conditions.


M17_UrbanAssaultGMI_PackOut_V5


The Urban Assault also excelled in external storage and this pack has those features as well.  One side has a zippered pouch and a hidden pocket in the back panel.  


M17_UrbanAssaultGMI_PackOut_V1


The other has a water bottle pocket.


M17_UrbanAssaultGMI_PackOut_V2


There’s also a transporter tail-like stuff pocket and another small horizontal zippered pocket on the front panel.  Like the original pack, lots of organization inside and out without the need for accessories that will jack up the cost.

Camelbak has offered to send over a sample so I can take a closer look.  Stay tuned for a full review.  Coming soon! 

The post First Look: All-New 2017 Camelbak Urban Assault Pack appeared first on .

First Look: Triple Aught Design Parallax Messenger Bag

$
0
0

TAD continues to release packs in Dimension Polyant VX ripstop.  The latest is the Triple Aught Design Parallax Messenger Bag. 


fbc30f9bdbcb67a40fbd884b9c96a050


The Parallax is 24.7L/1512 cubic inch messenger that includes some interesting features and hardware.  The biggest buzz about this bag, other than it’s size (more on that in a minute), has been TAD’s first use of the Fidlock magnetic slider buckle.  Manipulation of the Fidlock is going to be an addictive past time for Parallax owners.

The other thing that is intriguing to me is the strap system on this bag.  I’ve NEVER been a fan of slings for EDC because of their limitations and the Parallax is a paradox because it’s really a cross between a sling and a messenger bag.  You can wear it either cross body or shoulder carry and the strap looks adjustable and beefy enough to pull it off.  This video from Triple Aught Design highlights many of the features of the carry system.


Other than my Defy Recon, this might be the first one strap bag of significant capacity that I’ve actually wanted to try.  But, as you can see from the video, it’s a pretty large bag.  How large?  Mike Baker from the Perfect Pack Facebook Group snapped this picture of the Parallax next to his 1st Generation ITS Discrete Messenger Bag.


The Gen 1 ITS Discrete Messenger (left) and the Triple Aught Design Parallax Messenger Bag (right)

The Gen 1 ITS Discrete Messenger (left) and the Triple Aught Design Parallax Messenger Bag (right)


The Discrete Messenger has long been the standard-bearer in the large tactical urban messenger category and the Parallax dwarfs it.  Something to know before you order.  It’s either go big or go home with this one.

The Triple Aught Design Parallax Messenger retails for $300 and is available here


The post First Look: Triple Aught Design Parallax Messenger Bag appeared first on .

First Look: Mystery Ranch Front Pack

$
0
0

Our friends in Bozeman have released a slew of new packs lately but none more intriguing to me than the Mystery Ranch Front.


Mystery Ranch Front Pack

Mystery Ranch Front Pack


Why?  I’ve long obsessed over the 1DAP but it’s lack of availability here in the states coupled with specs that aren’t “big dude” friendly convinced me not to acquire one. With the Front, Mystery Ranch created a pack similar to the ASAP/1DAP, but made it larger.  If the published dimensions are to be believed, the new pack is 22″H x 12.5″W x 9″D and 1,159 cu in/19L in volume.  I’m skeptical because the ASAP/1DAP was 16″H x 10W x 6″D and 900 cu in/15L in volume.  If the new pack is 6″ taller, 2.5″ wider, and 3″ deeper… well… sorry, but that adds up to more than a 259 cubic inch difference in volume.

A friend of mine up in Wisconsin who recently acquired the Front graciously offered to give me a first hand look.  I took my old school Sweetpea along to do some comparison pics.  The Front wasn’t packed full but it didn’t seem to be 6″ taller than the Sweetpea, which according to Mystery Ranch is 18″.  It’s taller but not that much taller.


The new Mystery Ranch Front (left) and the discontinued Sweetpea (right)

The new Mystery Ranch Front (left) and the discontinued Sweetpea (right)


Here are the straps.  My Sweetpea has a large Futura harness installed.  The harness on the Front looks to be the Futura Lite, which was used on the 1DAP and is slightly narrower and not as bulky as the Futura (used on the ASAP and 3DAP).  I like that because it’s easier to sling the pack over one shoulder and the Futura on a pack the size of the Front is overkill anyway.


Here’s the Front on Ryan, who is 5’8.


As you can see, it’s a decent sized pack on him.  I tried it on and it’s an adequately sized small (bordering on mid-size) pack.  I’d have no problem carrying the Front.   


Mystery Ranch wisely included some interior storage.  The top accessory pocket has another zippered mesh pocket inside the lid to separate smaller items.


The main compartment was two more small zippered mesh pockets and an elastic sleeve designed to hold a hydration bladder, but it can also be used to secure a tablet or a small laptop or surface type device.  Note that the sleeve is not padded as this was intended to be a hunting or outdoor pack and not designed for device carry.  Also… thankfully… the rest of the compartment is slick.  They opted not to include the nylon bottle sized pockets that some felt the need to cut out so their gear wouldn’t get hung up by them.


Instead, Mystery Ranch added stretch pockets designed to hold a Nalgene sized water bottle on the outside of the Front.  Note that smaller sized bottles aren’t as secure and might fall out if the pack is turned sideways or inverted.


Despite the uncertainties about the Front’s dimensions and volume, I’m sold on it as an option for those who might be looking for something in between the size of the ASAP and 3DAP.  The Front retails for $199 and is available in Foliage (pictured), Coyote, Desolve Bare, and Mulitcam.  It’s available direct from Mystery Ranch’s website or select retailers.

The post First Look: Mystery Ranch Front Pack appeared first on .


Walther PPQ M2 Navy: German Precision

$
0
0

A couple of years ago, some of you may recall that I made a proclamation that I was prioritizing skills training over gear.  Well, if I’m being honest, I didn’t follow through.  Life got in the way. Somebody somewhere probably released another batch of great gear.  And that was that.  Well, that won’t happen this year.  I finally registered for the Gunsite 250 Pistol Course – otherwise known as the “Gunsite Experience”.  I’m attending in May and I couldn’t be more stoked!

As I took stock of the equipment I owned, I realized gear might not take as much of a back seat in 2017 as I thought.  My CCW is a M&P Shield.  I liked the idea of bringing my carry gun to the class, but something larger and higher capacity would make the week much more enjoyable.  Plus, I’ve been thinking about getting into IDPA.  And I don’t own a service size pistol.  Yes, this is how we talk ourselves into a gun purchase folks.

I started out looking at the M&P Pro.  It’s a popular gun in the IDPA Stock Service Pistol (SSP) Division and it was familiar due to my trigger time on the Shield.  The other gun I wanted to rent and shoot was the Walther PPQ M2.  I almost purchased the PPS when I was looking for a carry gun and I had read great things about the PPQ’s stock trigger.  I went to a local range and rented both guns.  The M&P proved to be very good and I shot fine with it.  Then I tried the Walther.  The experience left me wondering why anyone who gave the PPQ a solid run would buy the M&P Pro.


Walther PPQ M2 Navy

Walther PPQ M2 Navy


Two weeks later I was the proud owner of the Walther PPQ M2 Navy.  The Navy model features a threaded barrel and is designed for “maritime operations”.  I came across this video while doing some more research.


The underwater part is cool and all, but I really just wanted a threaded barrel for when the People’s Republic of Illinois decides to pass the Suppressor Bill that’s now before the state legislature. A guy can dream, right?  The 4.6″ barrel length would limit holster availability but to me it was worth it.  

Why the PPQ?  Two characteristics of the gun stood out.  First, the trigger was as advertised.  I wanted this gun to be a winter carry option and I like to keep the triggers on all my carry guns stock.  Either way, after shooting the PPQ, I had no desire to replace the trigger.  It has a smooth take-up with a well-defined break and insanely short .1″ reset.  Hands down, the best stock trigger I’ve ever experienced on a polymer, striker fired pistol.  Not 1911 smooth, but definitely on another plateau of performance when compared to anything from Glock, M&P or Springfield.


The PPQ's extra long slide stop and large magazine release.

The PPQ’s extra long slide stop and large magazine release.


The other was the ergonomics.  The designers at Walther evidently know what it takes to run a gun under duress.  I have stupid small hands for a guy my size but I have no problem reaching any of the controls on the PPQ’s frame.  I can work the slide and eject a magazine without shifting my grip at all.  Which no doubt will improve my gun handling.


The author has no issue reaching any of the controls with the small or medium backstrap installed.

The author has no issue reaching any of the controls with the small or medium back strap installed.


Walther even got the stippling right.  Unlike the Shield, I wouldn’t consider a custom stippling job on this gun.  It gives me adequate grip right out of the box.


The only thing I didn’t like about the gun were the factory sights.  I adhere to the doctrine “when in a fight, front sight”.  Therefore, I’m not a fan of a three dot sight picture.  Also, when the sights were aligned, there was too much space between the front sight and the back posts.  

I ultimately went with a .100 wide Dawson Precision Fiber Optic front…


And a fixed Dawson Charger .210 Tall x .125 rear sight.  The resulting sight picture is crisp and draws the eye to the front sight, which is what I wanted.  The fiber optic is bright and small enough to pick up quickly without covering up targets at longer distances. 


The Walther PPQ M2 Navy comes with a 15-round flush and 17-round extended 9mm magazine, multiple inter-changeable back straps, and a cable lock.  Also included is a Walther magazine loader and a heavier suppressor specific recoil spring (both not pictured).


Of all the guns I’ve owned to-date, this might be my favorite.  With the crisp trigger, I’m shooting tighter groups than I have in the past with any polymer pistol out of the box.  The gun is stupid easy to manipulate.  And I didn’t have to sacrifice round capacity because it’s right up there with the competition.  I couldn’t be happier and the greatest compliment I can pay Walther is that this gun has me considering the PPS M2 (referred to by some as the “mini PPQ”) as a replacement for my Shield.  It’s that good.   

Now off to find a holster that will accommodate the PPQ Navy’s threaded barrel…     

The post Walther PPQ M2 Navy: German Precision appeared first on .

What Packs Are Your Keepers?

$
0
0

If you subscribe to this site then you’re probably as much of a gear whore as I am.  A lot of gear comes and goes here at Loadedpocketz but certain packs have been mainstays in my collection.  I’m not talking about closet queens.  I’m talking about packs that have seen frequent use for more than a year (and multiple Shot Shows). And because we’re gear whores, I think it’s fair game to count bags that we’ve purchased, sold, and re-purchased; even multiple times. Yes, it happens and I’m not the only one given the discussions I’ve had with some of you over the years.

Here are a few of my mainstays…


VERTX EDC GAMUT


The Gamut has to be at the top of the list because it’s the bag I’ve carried the most since reviewing it in 2015.  It’s in my Work EDC rotation and it’s an absolute joy to carry due to the yoke harness. Add lots of versatile organization and very good device protection and you have a winner.  I just wish it was a little deeper.


TOM BIHN TRI STAR


Some one bag travelers fit a weeks worth of clothes in the Tri Star and I don’t know how they manage it.  Either their clothes are Hobbit sized or they are much more skilled at packing than I am.  I love the Tri Star for 1-3 day trips.  The ability to shift from hand to shoulder to backpack carry makes this bag a great option for the on-the-go minimalist traveler who prefers not to check a bag.


GORUCK BULLET 15L


This little gem is my white whale.  I’ve owned bought and sold three; the latest being the classic 1000D Two Compartment version, which I purchased pre-loved off a fellow Perfect Pack member just a week ago.  That one is not going anywhere.  Since GoRuck discontinued the Bullet 15, they are getting harder to find in good condition and they selling on average at 2-3 times their original retail price.  The original 1000D version is even more rare.  Don’t understand what is so special about it?  I think it’s the perfect setup for a grab and go bag. Just enough capacity and organization to be useful but long and wide enough so that even guys my size can carry it and not look stupid.

Honorable Mentions:  Camelbak Urban Assault, Maxpedition Jumbo EDC

What are your keepers?  Share in the comments.           

The post What Packs Are Your Keepers? appeared first on .

High Threat Concealment

$
0
0

We have gear from High Threat Concealment incoming.  More to follow. Stay tuned!  In the meantime, here’s a video from HTC to give you a little preview…


The post High Threat Concealment appeared first on .

First Look: Prometheus Design Werx Solo Jacket 100C

$
0
0

The Prometheus Design Werx Solo Jacket is made from 10-ounce 100% Cotton Canvas treated with a DWR finish.

PDW Solo Jacket 2


It sort of reminds me of the TAD Rogue Jacket, but hopefully without all the shrink-to-fit weirdness and gorilla length sleeves.  Also, that jacket was made from 6-ounce NYCO ripstop, so the material on the Solo Jacket will be heavier giving the jacket a more bombproof feel.

It looks like the Solo Jacket will be a touch longer also.  More like a garage jacket versus the motorcycle jacket inspired design of the Rogue.


PDW Solo Jacket 1


The Prometheus Design Werx Solo Jacket 100C retails for $198 and can be purchased from PDW’s website here.  

The post First Look: Prometheus Design Werx Solo Jacket 100C appeared first on .

Oakley SI Ballistic Det Cord Sunglasses Review

$
0
0

I was looking for eye pro for outdoor shooting and recently picked up a pair of Oakley SI Ballistic Det Cord Sunglasses.  


Oakley SI Ballistic Det Cord Sunglasses with PRIZM TR22 Lenses

Oakley SI Ballistic Det Cord Sunglasses with PRIZM TR22 Lenses


The Det Cord model was released in 2014 and was designed to meet the needs of Military, Law Enforcement, and the Shooting Sports.  I was definitely wanting something with a wrap around design that gives me good peripheral vision and impact protection.  The Det Cords meet the impact fragmentation requirements of MIL PRF 32432 and ANSI Z87.1-2010.  In order to meet MIL PRF 32432, the glasses are hit with a 0.15 caliber, 5.85 grain, T37 shaped projectile at about 640-660 feet per second. The eyewear must remain intact throughout the test, without experiencing any dislodged components or fracture to the lens. Certainly good enough for my philosophy of use.


The Det Cords have a few other features that appealed to me.  Mine came with the PRIZM TR22 lenses.  


The Prizm TR22 shooting lenses are designed to “tune light to maximize contrast that enhances contours and details. They are best suited for brighter light conditions, eliminating 78% of ambient light and blocks 100% of UVA, UVB, and UVC light”.  I found Oakley’s claim to be 100% true. Looking through these lenses is like putting a HD filter on a photograph.  Edge Eyewear’s Blade Runner XL have been my sunglasses of choice the past several years.  They’re very comfortable, cost-effective (read: cheap), and they also meet the ANSI Z87.1+2010 ballistic standard.  However, the Blade Runner XL lenses just make everything darker.  They don’t enhance my vision.  These PRIZM lenses make everything sharper including targets on the range.  I’ve also found them to be great even on overcast days.  For indoor shooting, they’re OK but I’d probably opt for the TR45 version of the same lenses, which only block 55% of ambient light.

The Det Cords also feature ear stems that fit very close so they don’t interfere with Ear Pro.  For me, that was a bit of a compromise.  The fit in general is a tad tighter than I’d like.  My hat size is a whopping 7 3/4 and so I have this problem often with sunglasses.  I purchased a pair of Oakley Fuel Cells around the same time to compare and they actually fit me better because they are just a touch wider.  I’m not sending the Det Cords back but I can already tell that they won’t be as comfortable as the Fuel Cells for all day wear.


The upside of the close fit is they are good to wear with a beanie or a watch cap on colder days.


Overall, despite the slightly tighter fit, I really like the Det Cords.  The TR22 shooting lenses are amazing and the Det Cords are more versatile than the SI Tombstones, which would look out-of-place for casual wear on the street.  The Oakley SI Ballistic Det Cords retail for $175 and can be purchased at various stores that sell Oakleys and other online outlets.      

The post Oakley SI Ballistic Det Cord Sunglasses Review appeared first on .

Triple Aught Design Axiom 25 Being Released April 7th

$
0
0

TAD is releasing the third bag in their X-Pac line tomorrow.  The Triple Aught Design Axiom 25 is a slick backpack design made from waterproof VX (X-Pac) sailcloth.  Jordan Lam, a member of the TAD Junkies forum, was visiting the mothership yesterday and snapped some pics of a prototype.


Triple Aught Design Axiom 25

Triple Aught Design Axiom 25


As the name would imply, it’s a 25 Liter pack that has some of the same features as their Parallax Messenger Bag, but in an EDC sized backpack.


Reportedly, the Axiom 25 will have an internal frame sheet and should be more structured than the Azimuth, which was designed to be a packable lightweight travel bag.


The pack will expand to 40L by releasing a zipper, which you can see near the center of the bag in the picture above.


There will be many mounting points for TAD accessories, which has been the case with their recent designs.  It’s not clear how much built-in organization it will have.  I was able to run the Parallax without adding anything so it will be interesting to see what comes out of the box with this pack. Some of the accessories are useful depending on the wearer’s EDC.  Certainly it’s great to have the option.

According to what I’ve heard, the Triple Aught Design Axiom 25 will sell for $350.  That will no doubt send some who were interested into sticker shock.  I’m waiting to hear on the dimensions and more information on the features before I make my decision.

The pack will be available exclusively from Triple Aught Design’s website.           

The post Triple Aught Design Axiom 25 Being Released April 7th appeared first on .

Building your Own IFAK for Everyday Carry

$
0
0

Many municipality budgets are being stretched thin and First Responder services are being affected in ways that aren’t always made known to the general public.  I was at my local range and I asked the manager if they had any trauma incidents since they opened.  There were two.  One accidental gunshot wound stemming from hot brass and a hand injury due to improper handling of a large-caliber revolver.  In the first case, it took only five minutes for emergency medical to reach the scene.  In the second, help didn’t arrive for fifteen minutes.  In both cases, the manager said it seemed like an eternity before they got there.

Fortunately, the range has employees with medical training on site and, in both instances, they lived.   Point being, if you truly want to be prepared, you can’t always rely on help getting there quickly.  And, even in the five-minute example, the woman would have probably bled out if care wasn’t administered to buy time until the EMT’s arrived.  Carrying your own IFAK (Individual First Aid Kit) is good idea.  Something that can handle wound trauma and not just a “Boo Boo Kit”.

I’m not going to cover Boo Boo Kits in-depth here because they’re pretty self-explanatory.  Most experts recommend you build your own because pre-made kits are usually overpriced.  And if purchased from unreliable sources, the kits can contain supplies that are poorly made crap and/or out-of-date.  With that said, a seller that is universally trusted and receives good marks for service is ITS Tactical.  Their ITS Boo Boo Kit is a good example of the things you should carry for simple First Aid.


ITS Boo Boo Kit

ITS Boo Boo Kit


The contents include:

(1) Triangle Bandage
(10) Band-Aid (6 Large, 4 Small)
(2) 3M Steri-Strips
(2) Povidone-Iodine Prep Pad
(2) Alcohol Prep Pad
(2) Triple Antibiotic
(2) Sting Relief Pad
(2) Burn Jel
(1) Moleskin (2” x 4” Strip)
(2) Lip Ointment
(2 pkgs. of 2 ea.) Electrolyte (Rehydration)
(2 pkgs. of 2 ea.) Ibuprofen (Inflammation, Soreness)
(2 pkgs. of 2 ea.) Non-Aspirin (Fevers)
(2 pkgs. of 1 ea.) Antihistamine (Allergic Reactions)
(2 pkgs. of 1 ea.) Anti-Diarrheal (Dehydration Prevention)
(2 pkgs. of 2 ea.) Aspirin (Heart Attack)

For more detail, click on the link to buy the ITS kit or use it as a guide to build your own.

For wound trauma, Band-Aids and Aspirin aren’t going to cut it.  You can overdo it and most people do, but there are some critical items that any trauma kit should contain…


NITRILE GLOVES

I list this first because gloves are critical to protect yourself against viruses such as hepatitis B virus (HBV), hepatitis C virus (HCV) and human immunodeficiency virus (HIV) when treating someone other than yourself or a close family member.  Nitrile gloves are preferred over latex because of their chemical resistance, their tendency to visibly rip when punctured, and to prevent possible latex allergies.  They are also three times more puncture resistant than Latex. Having a bunch in your kit is a good idea.  A back-up pair or three if you need them and some to give someone else if you have help and they don’t have gloves.  Sticking them in every nook of your IFAK pouch ensures they are readily available when you’re pulling out supplies to provide treatment.  Buy only medical Exam Grade gloves like the ones pictured below.  Note that the gloves provided in pre-made kits are almost always size XL.  If your hands are smaller, then buying gloves in a smaller size that actually fit would be a good idea.


AINPF


TOURNIQUET

If you have rapid uncontrolled blood loss, especially spurting blood from an artery, then applying a tourniquet to quickly cut off circulation and stop the bleeding is recommended because someone can bleed out in minutes in that scenario.  The average human body only has 8 pints of blood with a loss of greater than 40% generally being fatal. It’s a myth that applying a tourniquet will absolutely cause loss of limb. The incidence of injury is very low with tourniquet times of two hours or less.  If the bleeding is not severe, then foregoing the Tourniquet, applying pressure, and packing the wound (if not in the chest or abdomen) is the right treatment. More on that later.   

The gold standards are SOFTT-W (SOF Tactical Tourniquet Wide) and CAT (Combat Application Tourniquet).  They’ve had more use in the field and documented saves than any other.  Wider is better in most cases so the SOFTT-W 1.5″ strap compresses more tissue area and provides better patient comfort than the CAT.  The CAT is simpler and easier to apply one-handed although supposedly the new buckle design on the latest version of the SOFTT-W available direct from Tac Med Solutions has made it easier to use.  I went with the SOFTT-W because it’s a little more compact for EDC when pre-staged using the ITS Fold method but you can’t go wrong with either.  


Just make sure and buy yours from a trusted source.  Tac Med solutions or ITS Tactical for the SOFTT-W and Dark Angel Medical for the CAT Gen 7.

HEMOSTATIC DRESSING

Because arteries can recede back into the body when severed, placing the Tourniquet as high on the limb as possible is recommended (not just two inches above the wound).  If the wound is in the hip, groin, or shoulder area, then that might not be possible.  Packing the wound with a dressing with a clotting agent along with direct pressure may be the only way to control a major bleed in that area.  Quikclot Combat Gauze is the most widely used product.


image-prod-345


PRESSURE BANDAGE

If the bleeding is significant but not severe enough to call for a tourniquet or hemostatic dressing, then a pressure bandage is a good option.  The Israeli Bandage and the Olaes Modular Bandage are widely accepted as the best with the Israeli Bandage being the best for most EDC kits because of its size when stored.  Both offer a blood absorbent dressing along with a stretch wrap and clip to secure it.  The Olaes provides more features that the Israeli does not.  Research both to decide what’s best for your kit.

Israeli Bandage

Israeli Bandage

OTHER ITEMS

A HALO chest seal dressing to treat a sucking chest wound is included in some pre-made kits and I’m adding one to mine.  Other non-critical items would include a pair of medical shears to quickly remove clothing and to perform other cutting tasks.  I’ve upgraded to Leatherman Raptor Shears but a cheap pair of disposable combat shears would do.  A mouth-to-mouth mask for resuscitation. Regular gauze when blood clot agents or pressure bandages aren’t needed.  Also, a small roll of Duck or Gorilla tape to secure a dressing or patch a small wound. And a mylar blanket to control body temperature to prevent shock. 


POUCHES

Two of the best IFAK pouches are the D.A.R.K Pouch by Dark Angel Medical..


D.A.R.K. pouch

D.A.R.K. pouch


And the ITS ETA Trauma Kit Pouch by ITS Tactical.  


ITS ETA Trauma Kit Pouch

ITS ETA Trauma Kit Pouch


Both come in different sizes and colors.


TRAINING

Hopefully this gives you a good idea of how to build your own kit.  However, the best wisdom I can impart upon you is to get training.  I took a local full day course given by ACT FAST MEDICAL TRAINING here in the Chicago area.  


I wouldn’t have considered adding the Trauma items to my IFAK without the training I received and even the one day training wasn’t enough.  


I want and need more.  We invest hundreds of dollars on gear but many of us balk at spending a similar amount of money on skills training.  Training that could save a life including our own.  I urge everyone to think about training differently and make that investment in yourself.  You’ll be glad you did.      

The post Building your Own IFAK for Everyday Carry appeared first on .


What I Learned from my Gunsite 250 Experience

$
0
0

Earlier this month, I spent a week at the legendary Gunsite Academy in Paulden, Arizona.  I took their 250 Defensive Pistol otherwise known as “The Gunsite Experience”.


My Gunsite 250 Class. They always put the tall guy in the back middle.

My Gunsite 250 Class. They always put the tall guy in the back middle.


There are many articles on the web providing a blow-by-blow description of the class. This will not be one of those articles.  Instead, I’d like to share some of the insights I gleaned from the class and how I’ve been transformed as a shooter by making the investment in Gunsite training.


SAFETY FIRST

From the minute you step onto the Gunsite grounds, the four principles of gun safety are delivered as gospel.

  1. All Guns are Always Loaded
  2. Never let your Muzzle Cover Anything you aren’t Willing to Destroy
  3. Keep Your Finger off the Trigger until your Sights are on the Target
  4. Be sure of your Target and What’s Beyond It

You’ll probably notice these aren’t verbatim, because I wrote them from memory. Every student is required to memorize the principles and follow them religiously.  If you have a negligent discharge during the class, on or off the facility, you’re gone.  No exceptions.

I thought I was a pretty safe gun owner, but at one time or another before coming to Gunsite, I now know I’ve violated all four of these rules.   Dry firing upstairs in my office instead of in the basement (pointed at a brick cinder wall) to prevent a negligent round from leaving my property. Inadvertently covering a small part of my body during gun handling drills.  Not visually and physically verifying that my gun is unloaded every single time I bring it to safe.  It takes unwavering discipline to ensure safety while handling firearms.  Gunsite instruction instills that discipline.


NEVER RUN TO YOUR DEATH

This was one of the most common mistakes made in the simulators.  In the first practice run, once breaching the “Funhouse” or stepping into the ravine that served as an outdoor simulator, people moved quickly from area to area like you see on TV.  I was more methodical than most but I was told I still needed to slow down.


Knock, Knock. The author in Gunsite's

Knock, Knock. The author in Gunsite’s “Funhouse” indoor simulator.


My next run was more deliberate; “pieing” each room, carefully considering angles and keeping distance, while still maintaining marksmanship and good ammo management.


DON’T SKIMP ON THE CARDIO

Stress wreaks havoc on the body.  In the simulators, at the end of each run, my heart was racing and my breathing was heavy.  This made shooting accurately at the end even more difficult.  Gun Fighting is a martial art.  And like any martial art, you need to train your body to withstand its rigours and achieve optimal performance.  Even after years of training in Moo Duk Kwan, Tae Kwan Do, and Isshinryu, I wasn’t thinking that way going in.  I am now.


SLOW IS SMOOTH, SMOOTH IS FAST

The instructors at Gunsite weren’t fond of the saying because most of the time, slow is just… slow. Instead, they wanted us to go as fast as we could while still being smooth (and safe).


It’s a subtle change in mind-set but important when fights often come down to how fast you can put rounds accurately on target or get your gun back in the fight after reloading or clearing a malfunction.


WHEN IN A FIGHT, FRONT SIGHT

This by far made the biggest difference in my shooting.  The instructors preached multiple sight pictures.  If you shoot once, then it’s two sight pictures (before and after).  If you shoot a controlled pair, then its three sight pictures.  And so on.  Even when engaging multiple targets you need to take the millisecond to get that last sight picture. The difference between a shot hitting or missing (once I cleaned up my gun handling, stance, and footwork) almost always came down to site alignment and/or front sight focus.  And often times, it was front sight focus.


YOU CAN NEVER MISS FAST ENOUGH

Suppression fire is great but in the end you’re just burning ammo. And are you considering what’s around or behind your target?  As one of our instructors pointed out, what would scare the bad guys more?  Putting rounds into their cover or putting rounds into the other bad guy next to them?  If you can’t get a good shot off then they preached moving until you had a better angle.  And target verification was always an important topic.


WRAP

I hope I never get a chance to use the skills I learned at Gunsite in a true life or death situation. But, if I do, I now feel much more confident in my abilities to protect myself and my family.

About Gunsite

The original ‘American Pistol Institute’ (API) now known as Gunsite Academy offers firearms training to elite military personnel, law enforcement officers and free citizens of the US.  A schedule of classes and descriptions can be found here        

The post What I Learned from my Gunsite 250 Experience appeared first on .

Hill People Gear FrankenPack Review: Umlindi, Connor, and M2016

$
0
0

When I was a kid, I loved playing with Legos.  I guess that’s why I dig this Hill People Gear kit.  It’s like Legos for pack nerds.  The Connor has been my day hiking pack for 18 months now.  I recommended it to a couple of my close friends and they carry one now too.

Earlier this year, I was dorking around on the HPG Forum and I saw a post where someone used the new M2016 Buttpack as a top lid on a Umlindi and mounted a Connor without the harness as a compression pocket.  I’ve wanted to try the Umlindi but I was concerned that it would be too short. Using the M2016 as a top lid would solve that issue as the resulting combo would be 23 inches long. Perfect.  Also, I generally prefer panel loaders; top loaders can be a pain if you don’t organize your kit well.  The M2016 would solve that issue too; providing a quick access storage area for grab and go items. Adding the Connor for when I need more capacity was a no-brainer because I already had one.  Orders were placed and the FrankenPack was born.


its-alive-1200x475


FEATURES

All kidding aside, the resulting system is extremely versatile.  Total combined volume ranges from 500 to 4000 cubic inches (65L) depending on what components are used.


The Hill People Gear Umlindi with a M2016 Top Lid and Connor Pocket

The Hill People Gear Umlindi with a M2016 Top Lid and Connor Pocket


The Umlindi is a mid-sized pack that measures 19″H x 11’W x 6.5″D with a capacity of 2,000 cubic inches (30L).  It features a removable framesheet with a single 7075 aluminum alloy stay.  There are tabs at the top of the main compartment that can be used to hang accessories…


Like this HPG TaraInsert and Tool Roll to add some internal organization.


The Umlindi features the outstanding Hill People Gear yoke harness, which is removable and so beloved for its ability to handle loads that some buy it to mod other packs.  Load lifters, bungee attachment points for reservoir hose routing, and a sternum strap round out the package.


Unlike the Connor, the Umlindi can accept one of Hill People Gear’s load bearing hip belts and I highly recommend one if your pack weight regularly exceeds 35 lbs.  I plan on picking one up.  HPG claims the Umlindi is rated at 75 lbs without a belt, but I wouldn’t want to do it.  At least not without a really good chiropractor on speed dial.

The Umlindi features dual wand pockets that can hold a USGI 1qt Canteen or this Source Kangaroo 1L Collapsible Canteen.


When used with the compression straps, they also do a great job securing longer items like tent poles, trekking poles, or camera tripods.


The M2016, when docked with a Prairie or Recon Belt, can be used as a go fast Lumbar Pack for exploring away from base camp and/or for day hikes.  It deserves its own review in that capacity and I’ll do that once I invest in a belt.


Hill People Gear M2016 Buttpack

Hill People Gear M2016 Buttpack


In the meantime, it makes for a perfectly serviceable top lid for the Umlindi.  It attaches via top compression straps…


and bottom compression straps using G-Hooks.


The interior features a zippered mesh pocket and a spacious main compartment.


PALS grid material allows for the attachment of Velcro or PALS compatible accessories to add organization if needed.


The Umlindi’s side compression is very effective in keeping things tight when you aren’t running at capacity.


It can also be used to secure any of HPG’s compression panels.  In this case, my Connor with the harness removed; otherwise known as the Connor Pocket. Compression panels are great for clothing or anything relatively flat.  In this case, I’m just carrying my shell.


The inside of the Connor also features PALS grid.  I attached the panel to the Umlindi by using the pack’s bottom compression straps and the included G-hooks…


as well as using Grimlocs to anchor the top.  In this setup, it can detached and the Connor’s full panel opening allows easy access to what’s inside.  The Connor also features an exterior vertical zippered pocket and two mesh slip pockets, which makes it more versatile than the smaller and simpler Tarapocket.


CARRY

Overall, I’ve been very pleased with how the Frankenpack carries.


With the compression, it’s fairly low profile when you don’t want or need to load it to capacity.


And that I can strip any one of the three components and use them individually or in combination really covers a lot of philosophies of use.


I’d be remiss if I didn’t mention any downsides.  First, running all three products at once adds up to quite a bit of weight.  Just over five pounds empty.  It’s a good thing the HPG yoke harness is so effective because that’s starting out in a pretty deep hole. If you’re looking for an ultralight trail pack because you’re counting ounces, this isn’t it.

The other obvious downside is cost.  I reconcile that by thinking of this as three separate pack purchases with the added bonus that they can be used together.  And I like the Hill brother’s gear. If you’re not willing to go all in and tend to spread your dollars across multiple brands then this probably isn’t right for you.

I hope this has given you a good idea of how these products can be used in tandem.  The Umlindi ($220), Connor ($148), and M2016 ($135) are all available in Manatee Grey and Ranger Green/Khaki and can be purchased direct from Hill People Gear’s website.

The post Hill People Gear FrankenPack Review: Umlindi, Connor, and M2016 appeared first on .

High Threat Concealment Vantage Holster Review

$
0
0

I’ve had a CCL here in the People’s Republic of Illinois ever since the law was passed and licenses were issued three years ago.  It’s almost cliche, but In that amount of time, I’ve accumulated a draw full of holsters.  Most of them are Kydex because I prefer that material with plastic guns.  I used to carry a M&P Shield but a month ago I “gunned up” to a Walther PPQ (for reasons I’ll document in another article).  When I bought the PPQ, I went searching for a OWB holster that I could wear for concealed carry, classes, and IDPA competitions.  After some research, I ultimately went with the High Threat Concealment Vantage Holster.


High Threat Concealment Vantage Holster

High Threat Concealment Vantage Holster


There is a huge number of thermoplastic holster makers out there and sorting through them can be an exhausting and somewhat intimidating experience.  High Threat Concealment is a bit of a hidden gem; a small veteran-owned company “specializing in the development of low profile tactical gear for close protection and/or low visibility operations in both permissive and non-permissive environments”.  All of its products are made in the USA and currently fielded by security contractors, federal agents, military units, and government personnel around the globe including DOS (Department of State).


SPECS

Each piece of gear is made to order, hand fitted and triple-checked with an actual artifact (no blue guns).  HTC uses premium grade Boltaron, which is harder to work with but has superior temperature and impact resistance versus Kydex.  That can be especially important in extreme conditions.  Kydex can deform in extreme heat, which can alter weapon retention, and can also become brittle and crack in below-freezing temperatures.  I haven’t experienced that with any of my Kydex holsters to-date, but why not use a higher performing material if it’s out there and available at comparable cost?

The High Threat Concealment Vantage Holster comes standard with 0°cant, but it can be adjusted to have a 15° FBI-style forward cant.  Ride height can be adjusted up to 3/4″.


The HTC Vantage belt loops are offset to hold the holster closer to the body and the included standard loops can fit 1.5

The HTC Vantage belt loops are offset to hold the holster closer to the body and the included standard loops can fit 1.5″ to 1.75″ wide belts.


Aesthetically, as you can see from the pictures, the Vantage is a nice looking holster with hand polished edges and quality hardware.  The same goes for their Dual Magazine Holster.


High Threat Concealment Dual Magazine Holster

High Threat Concealment Dual Magazine Holster


PERFORMANCE

I ran the HTC Vantage Holster and Dual Magazine Carrier during a full week of training at the legendary Gunsite Academy in Paulden, Arizona.  For comparison, I also brought a Blade Tech rig, which is also sold in the Pro Shop at Gunsite.  Blade Tech makes a great product but it didn’t take me long to figure out that I preferred the HTC setup.


The author in the Gunsite "Funhouse" using the High Threat Concealment Vantage Holster.

The author in the Gunsite “Funhouse” using the High Threat Concealment Vantage Holster.


The primary difference is that the Blade Tech product is friction fit to the gun.  That’s great for speed of draw, but one day it rained and the temperature dropped requiring all of us to wear multiple layers.  There were several times that my firearm didn’t seat completely into the Blade Tech holster because my rain shell got caught between the gun and the holster.  This happened to almost every student in the class.  The High Threat Concealment holster provides an audible click letting the wearer know that the gun is properly seated.  Also, once I adjusted the tension, I didn’t notice much of a difference with my draw between the two.  The Blade Tech went into my bag after the first day and I never looked back.


Drawing from the HTC Vantage during "Head-to-Head" Drills.

Drawing from the HTC Vantage during “Head-to-Head” Drills.


During the week, we drew from the holster hundreds of times.  I’ve also used the Vantage for dry fire training since returning from Gunsite and have not had a single issue.  The finish on my Walther PPQ also shows no wear.  It’s been everything I could ask for in an outside the waistband holster.

The Dual Magazine Holster also performed.  I was able to index my magazines effectively and reload quickly during timed drills.  Retention was good without slowing down my tactical and speed reloads. It complimented the Vantage well.


IMG_5396_F


Overall, I trust this gear from High Threat Concealment enough that it will be my competition rig for IDPA and I’ll also use it on days when I want to conceal carry outside the waistband.  And ultimately that’s the best endorsement I can give, because if I’m willing to use a piece of gear that my life may depend on, you can be damn sure it has earned my complete trust.

The High Threat Concealment Vantage Holster retails for $94 and the dual Magazine Holster retails for $60.  It’s available in Black or Flat Dark Earth for a variety of popular firearm makes and models.  It can be ordered online direct from HTC’s website.  


The post High Threat Concealment Vantage Holster Review appeared first on .

First Look: Triple Aught Design Spectre 34L Backpack

$
0
0

Unless you’ve been living under a rock, you’ve probably heard that Triple Aught Design has ventured into the outdoor pack realm with its launch of the Spectre series.  The Spectre packs are designed to be lighter weight and modular while still maintaining the durability that TAD enthusiasts expect in their gear.  What’s intrigued me about TAD in the post Patrick Ma-era is that they haven’t been afraid to step outside of their comfort zone; developing new designs in advanced materials for different philosophies of use.  The San Francisco based company sent me their Triple Aught Design Spectre 34L after I handled the 22L liter version at Overland Expo West.  I’ve carried it for a few weeks now; mostly on hikes and for a long weekend trip as my travel/EDC pack.


Triple Aught Design Spectre 34L Backpack

Triple Aught Design Spectre 34L Backpack


I’ve had it for a short period, but a few things stand out about this bag. First, the harness is removable and adjustable; similar to the Futura harness on some of Mystery Ranch’s offerings.  The major difference is that the TAD harness is one size fits all within the adjustment range whereas Mystery Ranch makes its Futura harness in different sizes (S-XXL).


The adjustable harness on the TAD Spectre 34L.

The adjustable harness on the TAD Spectre 34L.


The larger packs in the line (34L and 46L) include a removable waist belt.  Here is a TAD video showing how to adjust the packs, which should give you a good feel for the possibilities.


The 22L has a belt but it’s non-removable.  In my opinion, a pack that size doesn’t need a belt and even if you feel it does, it should be removable by the wearer.  It’s one of the few mis-steps TAD made with this new line and it’s one of the reasons why I opted to evaluate the 34L.  My 1st Generation Litespeed is safe in the stable for now although I’m looking forward to the release of the Axiom 18L later this year.  But I digress.

The Spectre 34 has other notable features.  TAD included anchor points on the exterior and interior of the pack for their line of Spectre accessories that have been released.  They include a transporter tail, external hydration pocket, and a version of the OP1 and GPP2 pouches in the new LS-42 material.

Ah yes, the new material.  Dimension Polyant LS-42 is a sailcloth that consists of a random array of non-woven filaments versus the familiar X-Pac diamond rip-stop pattern that we’ve seen in some of the recent TAD offerings.  What does that mean exactly?  It’s highly water-resistant, abrasion resistant, and very unique looking.  Honestly, I didn’t think I would like it but it’s absolutely stunning in person; especially with the Ranger Green webbing.  Also, by using lighter weight materials, TAD shaved nearly a pound off this pack compared to the Fastpack EDC.  At 56 ounces, I wouldn’t call the Spectre 34 “light” – especially compared to similarly sized packs made especially for trail use.  But, if you were looking for a lighter weight pack from TAD, this is it.

Overall, my general impression of the pack after carrying it for a few outings both on-grid and off is favorable.  I love the modular design in an outdoor pack. The Spectre is about as waterproof as a non-dry bag can be, which is a real asset out on the trail.  Accessories can add storage options but the organization that the Spectre does have is really well done.  The stretch side pockets will secure a full-sized Nalgene.  The vertical side zippered pockets will completely enclose my tripod, which is a first.  The harness is good but it’s not as comfortable as the one on my Hill People Gear Connor.  But, to be fair, that’s a pretty high bar that few manufacturers come close to meeting.  Anyway, I’m looking forward to getting out more with this one.          

The Triple Aught Design Spectre 34L retails for $275.  The LS-42 only comes in the one color at the time of this writing but the webbing is available in Wolf Grey and Ranger Green.  The pack can be purchased directly from TAD here. Look for a full review later in the Summer. 

The post First Look: Triple Aught Design Spectre 34L Backpack appeared first on .

First Look: Evergoods CPL24 and MPL30 Backpacks

$
0
0

I’ve come to the realization that I’m in a pretty major EDC pack rut.  So, I’m currently curating a selection of new EDC packs to try. They won’t be from brands like TAD, GoRuck, Arc’teryx, Hill People Gear, or Mystery Ranch.  I want to branch out and experiment with some gear from lesser known manufacturers and perhaps even some start-ups.  Evergoods would fall into that later category.  Their Kickstarter Campaign kicks off July 11th with two new packs – the Evergoods CPL24 and MPL30 Backpacks.  If you’re rolling your eyes right now because you’ve had poor backer experiences like me (two words – “Coolest Cooler”), then you’re probably hesitant to invest again. Nothing is garaunteed, but know that this isn’t two dudes  off the street without industry experience starting up something on a whim.  Jack Barley was the co-founder of GoRuck and was responsible for R&D and Product Development. Kevin Dee worked at “The Forge” – Patagonia’s Advanced R&D Center. Reminscent of GoRuck, their entire design process has been chronicled on social media. Stemming from that and some discussions I’ve had with Jack, I’m convinced they’ll have a successful launch.


EVERGOODS CPL24

Of the two packs, I’m most interested in the CPL24.


Evergoods CPL24 Baackpack

Evergoods CPL24 Baackpack


The profile reminds me of the Arc’teryx Blade 24.  Very streamlined and low profile.  No overt branding. In fact, the external patch is hook and loop so you can cover it with your own patch if desired (although I kind of dig their logo).  Aesthetics-wise, this pack would be at home in a coffee shop or boardroom.  Very urban friendly.

It’s also obvious that Evergoods put a lot of thought and effort into ergonomics.


CPL-Rotating-0.3-sec


The shoulder straps are made from EVA foam and are contoured.  The GoRuck DNA is evident.  As you can see from the photo below, this pack will carry high. I’d be willing to bet it will have the same solid feel as the GoRuck GR-Series.


Evergoods - Jack on the Town 1 (207 of 240)


All of the compartment’s of the pack are designed to have their own volume so contents in one doesn’t steal space from another.  There are top and side carry handles.  The laptop sleeve and main compartments can be accessed from the side.  Overall, the CPL24 has lots of thoughtful features. Here’s a video that provides a complete rundown.


Two major omissions from my perspective:

  • No attachment points inside the pack for an admin panel/pouch or additional organization
  • No internal loop panels or pockets for bag carry of a concealed firearm

If the pack carries as good as it looks, then I’d be willing to bench my Vertx EDC Gamut and work around the feature gaps.  


Evergoods MPL30

The MPL30 is designed for more outdoor use.


The Evergoods MPL30 Backpack

The Evergoods MPL30 Backpack


At 30 liters, you can definitely load more gear in this one.  The same design principles were carried over from the CPL24.  Many of the compartments have their own volume.  The straps are contoured.  The back panel is curved to better follow the lines of the body.  I suspect this pack will have a very solid feel also.


MPL KS Grid 1


Here’s another video that provides a rundown of the MPL30’s features.


To be honest, I wasn’t sold on the pack until Jack demonstrated in the video how effective the compression straps were.  The fact that they don’t block access to the main compartment is an added bonus.  In the end, only two things kept me from going with the MPL30:

  • I’m not as fond of black as a colorway for outdoor use.
  • The hip belt is non-removable.

The non-removable hip belt will be a problem for some because this is the Arc’teryx Khard all over again. A pack designed for outdoor use that many will want to EDC if they could only figure out a way to stow the belt.  Arc’teryx finally released an update to the Khard earlier this year.  Time will tell if Evergoods is forced to do the same.    

Overall, I’m excited for this launch.  These packs show promise.  Sign up here to get notified when the Kickstarter launches.  There will be three pricing tiers. 30%, 26% and 22% off expected retail. For the CPL24, that will be $199/209/219.  For the MPL30, $229/239/249.  Obviously, jump in very early if you want to get the best discount.   

The post First Look: Evergoods CPL24 and MPL30 Backpacks appeared first on .

Viewing all 411 articles
Browse latest View live